
- 3DTascalX Node-locked
- 3DTascalX Floating
- 3DTascalX/Light
- 3DFovi
User Guide
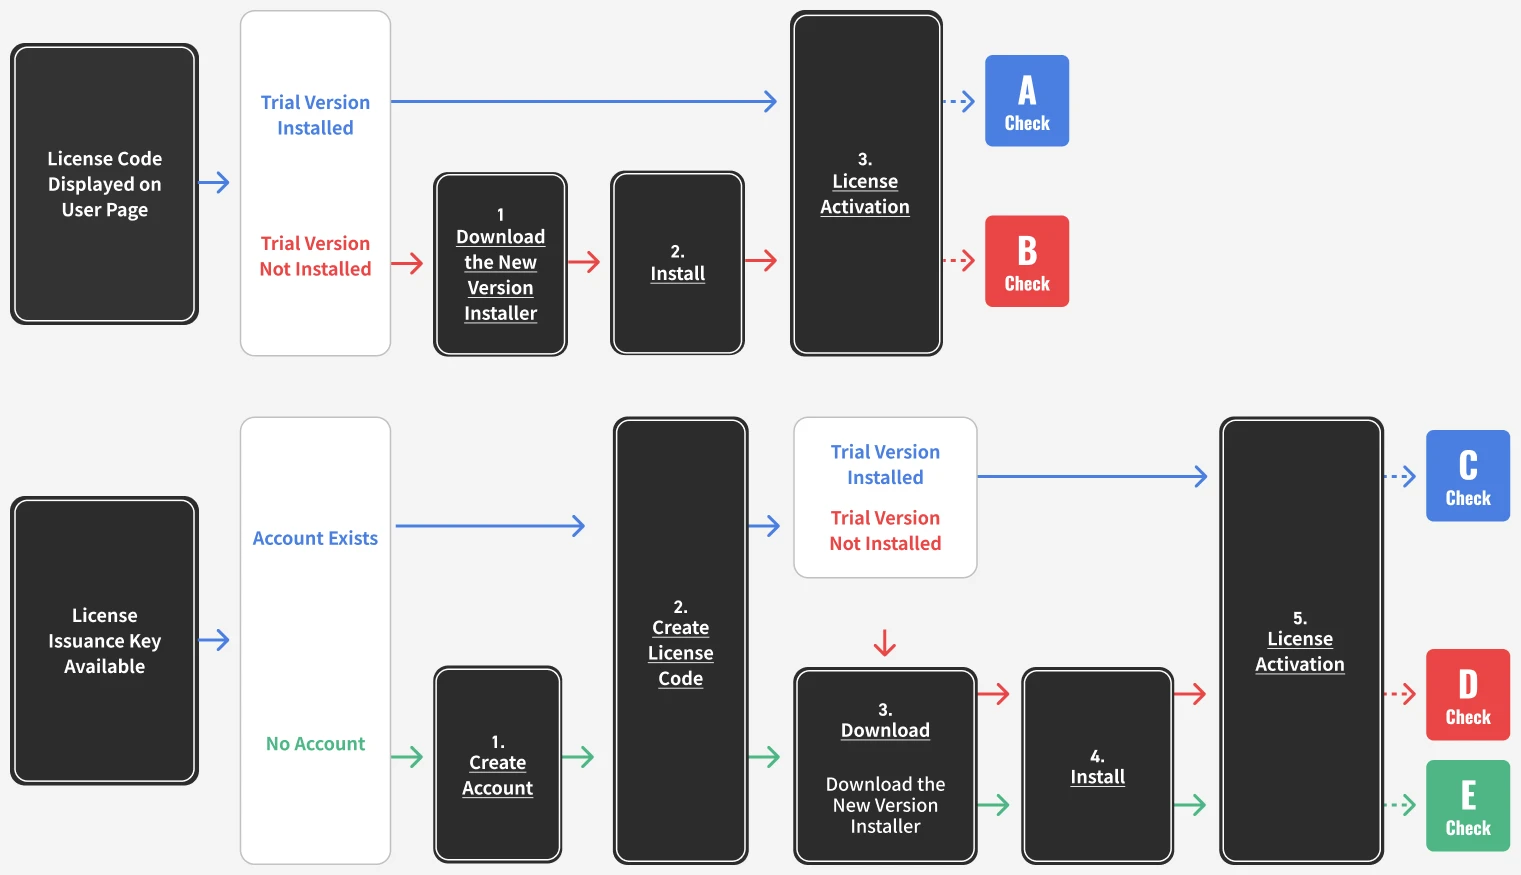
Here is guidance of procedures after product purchase and how to renew a license. Some steps may differ depending on the product, so please review the applicable product and details before proceeding.
FLOW From Purchase to License Activation
New Purchase(3DTascalX Node-locked、3DTascalX/Light、3DFovi)
- 3DTascalX Node-locked
- 3DTascalX/Light
- 3DFovi

For users who have installed the trial version and can see their license code on the user page
- 3DTascalX Node-locked
- 3DTascalX/Light
- 3DFovi
- 3 License Activation
Launch the Activation Manager.
3DTascalX Node-locked
From the Windows Start menu, select[All >]/[#]/[3DX**]/[C’set ActivationManager]
3DTascalX/Light
From the Windows Start menu, go to[All >]/[#]/[3DXL**]/[C’set ActivationManager]
3DFovi
From the Windows Start menu, go to[All >]/[#]/[3DFovi]/[C’set ActivationManager]
(**indicates a number.)
If the [User Account Control] dialog appears, click [Yes].


Click [Internet Activation / Renewal] on the left side of the screen.

Copy the license code of the purchased product from the user page, paste it into the Activation Manager, and click the [Get Product Information] button.
※ If a proxy is configured (the error message “212: Failed to connect to the server.” is displayed), enter the required information from [Settings] on the left side of the screen.
※ If the “9999: Other Error” message appears, or if activation still fails after setting up the proxy, please proceed with Proxy Activation.

The name of the purchased product and its options will be displayed.
Click the [Start Activation] button.

Clicking the [Yes] button will start the activation process.
When all items reach 100%, click the [Close] button.

When the license code activation is successful, the product name, option name, and expiration date will be displayed on the Activation Manager main screen.

When the license code activation is successful, the activation status in the “Owned Licenses” section on the user page will change to “Activated.”

For users who have a license code displayed on the user page and have not installed the trial version
- 3DTascalX Node-locked
- 3DTascalX/Light
- 3DFovi
- 1 Download
Enter your user ID and password on the user page to log in.
Access the user page here
A list of owned licenses will be displayed.
From the right side of the screen, click [Download] for the “New Version Installer” of the purchased product.
The installer file download will begin.
- 2 Install
※ If an older version is installed, it must be uninstalled first.
Right-click the downloaded file and select [Run as administrator].
For installation instructions, please refer to the installation guide below.
- 3 License Activation
Launch the Activation Manager.
3DTascalX Node-locked
From the Windows Start menu, select[All >]/[#]/[3DX**]/[C’set ActivationManager]
3DTascalX/Light
From the Windows Start menu, go to[All >]/[#]/[3DXL**]/[C’set ActivationManager]
3DFovi
From the Windows Start menu, go to[All >]/[#]/[3DFovi]/[C’set ActivationManager]
(**indicates a number.)
If the [User Account Control] dialog appears, click [Yes].
Click [Internet Activation / Renewal] on the left side of the screen.
Copy the license code of the purchased product from the user page, paste it into the Activation Manager, and click the [Get Product Information] button.
※ If a proxy is configured (the error message “212: Failed to connect to the server.” is displayed), enter the required information from [Settings] on the left side of the screen.
※ If the “9999: Other Error” message appears, or if activation still fails after setting up the proxy, please proceed with Proxy Activation.
The name of the purchased product and its options will be displayed.
Click the [Start Activation] button.
Clicking the [Yes] button will start the activation process.
When all items reach 100%, click the [Close] button.
When the license code activation is successful, the product name, option name, and expiration date will be displayed on the Activation Manager main screen.
When the license code activation is successful, the activation status in the “Owned Licenses” section on the user page will change to “Activated.”
For users who have a license issuance key and an account, and have installed the trial version
- 3DTascalX Node-locked
- 3DTascalX/Light
- 3DFovi
- 2 Obtain License Code
If you have a license issuance key, you must issue a license code in order to use the product.
Please follow the steps below.
Enter your user ID and password on the user page to log in.
Access the user page here
Click the [Add License] button.

Enter the license issuance key and click the [OK] button.

The products included in the license issuance key will be displayed.
Click the [Add to Owned Licenses] button.
A list of owned licenses will be displayed, and the license code for the product included in the license issuance key will appear.

- 5 License Activation
Launch the Activation Manager.
3DTascalX Node-locked
From the Windows Start menu, select[All >]/[#]/[3DX**]/[C’set ActivationManager]
3DTascalX/Light
From the Windows Start menu, go to[All >]/[#]/[3DXL**]/[C’set ActivationManager]
3DFovi
From the Windows Start menu, go to[All >]/[#]/[3DFovi]/[C’set ActivationManager]
(**indicates a number.)
If the [User Account Control] dialog appears, click [Yes].
Click [Internet Activation / Renewal] on the left side of the screen.
Copy the license code of the purchased product from the user page, paste it into the Activation Manager, and click the [Get Product Information] button.
※ If a proxy is configured (the error message “212: Failed to connect to the server.” is displayed), enter the required information from [Settings] on the left side of the screen.
※ If the “9999: Other Error” message appears, or if activation still fails after setting up the proxy, please proceed with Proxy Activation.
The name of the purchased product and its options will be displayed.
Click the [Start Activation] button.
Clicking the [Yes] button will start the activation process.
When all items reach 100%, click the [Close] button.
When the license code activation is successful, the product name, option name, and expiration date will be displayed on the Activation Manager main screen.
When the license code activation is successful, the activation status in the “Owned Licenses” section on the user page will change to “Activated.”
For users who have a license issuance key and an account, but have not installed the trial version
- 3DTascalX Node-locked
- 3DTascalX/Light
- 3DFovi
- 2 Obtain License Code
If you have a license issuance key, you must issue a license code in order to use the product.
Please follow the steps below.
Enter your user ID and password on the user page to log in.
Access the user page hereClick the [Add License] button.
Enter the license issuance key and click the [OK] button.
The products included in the license issuance key will be displayed.
Click the [Add to Owned Licenses] button.A list of owned licenses will be displayed, and the license code for the product included in the license issuance key will appear.
- 3 Download
Enter your user ID and password on the user page to log in.
Access the user page hereA list of owned licenses will be displayed.
From the right side of the screen, click [Download] for the “New Version Installer” of the purchased product.
The installer file download will begin.
- 4 Install
※ If an older version is installed, it must be uninstalled first.
Right-click the downloaded file and select [Run as administrator].
For installation instructions, please refer to the installation guide below.
- 5 License Activation
Launch the Activation Manager.
3DTascalX Node-locked
From the Windows Start menu, select[All >]/[#]/[3DX**]/[C’set ActivationManager]
3DTascalX/Light
From the Windows Start menu, go to[All >]/[#]/[3DXL**]/[C’set ActivationManager]
3DFovi
From the Windows Start menu, go to[All >]/[#]/[3DFovi]/[C’set ActivationManager]
(**indicates a number.)
If the [User Account Control] dialog appears, click [Yes].
Click [Internet Activation / Renewal] on the left side of the screen.
Copy the license code of the purchased product from the user page, paste it into the Activation Manager, and click the [Get Product Information] button.
※ If proxy settings are enabled and the error message “212: Failed to connect to the server.” appears, please enter the required information from [Settings] on the left side of the screen.
※ If the “9999: Other Error” message appears, or if activation still fails after setting up the proxy, please proceed with Proxy Activation.
The name of the purchased product and its options will be displayed.
Click the [Start Activation] button.
Clicking the [Yes] button will start the activation process.
When all items reach 100%, click the [Close] button.
When the license code activation is successful, the product name, option name, and expiration date will be displayed on the Activation Manager main screen.
When the license code activation is successful, the activation status in the “Owned Licenses” section on the user page will change to “Activated.”
For users who have a license issuance key but do not have an account
- 3DTascalX Node-locked
- 3DTascalX/Light
- 3DFovi
- 1 Create an Account
To use the product, you must create a user page account.
Sign up here
Click [Sign Up].
After entering your customer information, click the [Next] button.

Review the entered information and click the [Register] button.
If you need to make changes, click the [Back] button.
Account creation is complete.
Click the [Log In] button.
- 2 Obtain License Code
If you have a license issuance key, you must issue a license code in order to use the product.
Please follow the steps below.
Enter your user ID and password on the user page to log in.
Access the user page hereClick the [Add License] button.
Enter the license issuance key and click the [OK] button.
The products included in the license issuance key will be displayed.
Click the [Add to Owned Licenses] button.A list of owned licenses will be displayed, and the license code for the product included in the license issuance key will appear.
- 3 Download
Enter your user ID and password on the user page to log in.
Access the user page hereA list of owned licenses will be displayed.
From the right side of the screen, click [Download] for the “New Version Installer” of the purchased product.
The installer file download will begin.
- 4 Install
※ If an older version is installed, it must be uninstalled first.
Right-click the downloaded file and select [Run as administrator].
For installation instructions, please refer to the installation guide below.
- 5 License Activation
Launch the Activation Manager.
3DTascalX Node-locked
From the Windows Start menu, select[All >]/[#]/[3DX**]/[C’set ActivationManager]
3DTascalX/Light
From the Windows Start menu, go to[All >]/[#]/[3DXL**]/[C’set ActivationManager]
3DFovi
From the Windows Start menu, go to[All >]/[#]/[3DFovi]/[C’set ActivationManager]
(**indicates a number.)
If the [User Account Control] dialog appears, click [Yes].
Click [Internet Activation / Renewal] on the left side of the screen.
Copy the license code of the purchased product from the user page, paste it into the Activation Manager, and click the [Get Product Information] button.
※ If a proxy is configured (the error message “212: Failed to connect to the server.” is displayed), enter the required information from [Settings] on the left side of the screen.
※ If the “9999: Other Error” message appears, or if activation still fails after setting up the proxy, please proceed with Proxy Activation.
The name of the purchased product and its options will be displayed.
Click the [Start Activation] button.
Clicking the [Yes] button will start the activation process.
When all items reach 100%, click the [Close] button.
When the license code activation is successful, the product name, option name, and expiration date will be displayed on the Activation Manager main screen.
When the license code activation is successful, the activation status in the “Owned Licenses” section on the user page will change to “Activated.”
New Purchase(3DTascalX Floating)
- 3DTascalX Floating
For users who have a license code displayed on the user page
- 3DTascalX Floating
- 1 Download
※ Perform this procedure on the PC where the License Server (Network License Server) is installed.
Enter your user ID and password on the user page to log in.
Access the user page hereA list of owned licenses will be displayed.
From the right side of the screen, click [Download] for the “New Version Installer” of the purchased product.
The installer file download will begin.
- 2 Install
※ If an older version is installed, it must be uninstalled first.
Right-click the downloaded file and select [Run as administrator].
From the installation menu after selecting the language, choose [Install Floating License Server].
For more details, please refer to the installation guide.
- 3 License Activation
Launch NetLicenseController.
3DTascalX Floating
From the Windows Start menu, go to[All >]/[N]/[NetLicense]/[NetLicenseController]
If the [User Account Control] dialog appears, click [Yes].

Click [OK] to start the service.

If the message “Failed to connect to the License Server” appears and you click [OK], NetLicenseController will launch.
If the [Start] button for the service is grayed out, the service has already started.

Click [License Management] to launch the Activation Manager.

Click [Internet Activation / Renewal] on the left side of the screen.
Copy the license code of the purchased product from the user page, paste it into the Activation Manager, and click the [Get Product Information] button.
※ If a proxy is configured (the error message “212: Failed to connect to the server.” is displayed), enter the required information from [Settings] on the left side of the screen.
※ If the “9999: Other Error” message appears, or if activation still fails after setting up the proxy, please proceed with Proxy Activation.
The name of the purchased product and its options will be displayed.
Click the [Start Activation] button.
Clicking the [Yes] button will start the activation process.
When all items reach 100%, click the [Close] button.
When the license code activation is successful, the product name, option name, and expiration date will be displayed on the Activation Manager main screen.
※ If the firewall in Windows Defender or other security software is enabled,
allow communication for “LicServ.exe” located in C:\Program Files\NetLicense”.After closing the Activation Manager, exit NetLicenseController, then download the “New Version Installer” on the PC where 3DTascalX will be used (client), and from the installation menu, select [Install 3DTascalX].
For users who have a license issuance key and an account
- 3DTascalX Floating
- 2 Obtain License Code
If you have a license issuance key, you must issue a license code in order to use the product.
Please follow the steps below.
Enter your user ID and password on the user page to log in.
Access the user page hereClick the [Add License] button.
Enter the license issuance key and click the [OK] button.
The products included in the license issuance key will be displayed.
Click the [Add to Owned Licenses] button.A list of owned licenses will be displayed, and the license code for the product included in the license issuance key will appear.
- 3 Download
Enter your user ID and password on the user page to log in.
Access the user page hereA list of owned licenses will be displayed.
From the right side of the screen, click [Download] for the “New Version Installer” of the purchased product.
The installer file download will begin.
- 4 Install
※ If an older version is installed, it must be uninstalled first.
Right-click the downloaded file and select [Run as administrator].
After selecting the language, choose [Install Floating License Server] from the installation menu.
For more details, please refer to the installation guide.
- 5 License Activation
Launch NetLicenseController.
3DTascalX Floating
From the Windows Start menu, go to[All >]/[N]/[NetLicense]/[NetLicenseController]
If the [User Account Control] dialog appears, click [Yes].
Click [OK] to start the service.
If the message “Failed to connect to the License Server” appears and you click [OK], NetLicenseController will launch.
If the [Start] button for the service is grayed out, the service has already started.
Click [License Management] to launch the Activation Manager.
Click [Internet Activation / Renewal] on the left side of the screen.
Copy the license code of the purchased product from the user page, paste it into the Activation Manager, and click the [Get Product Information] button.
※ If a proxy is configured (the error message “212: Failed to connect to the server.” is displayed), enter the required information from [Settings] on the left side of the screen.
※ If the “9999: Other Error” message appears, or if activation still fails after setting up the proxy, please proceed with Proxy Activation.
The name of the purchased product and its options will be displayed.
Click the [Start Activation] button.
Clicking the [Yes] button will start the activation process.
When all items reach 100%, click the [Close] button.
When the license code activation is successful, the product name, option name, and expiration date will be displayed on the Activation Manager main screen.
※ If the firewall in Windows Defender or other security software is enabled,
allow communication for “LicServ.exe” located in C:\Program Files\NetLicense”.After closing the Activation Manager, exit NetLicenseController, then download the “New Version Installer” on the PC where 3DTascalX will be used (client), and from the installation menu, select [Install 3DTascalX].
For users who have a license issuance key but do not have an account
- 3DTascalX Floating
- 1 Create an Account
To use the product, you must create a user page account.
Sign up here
Click [Sign Up].After entering your customer information, click the [Next] button.
Review the entered information and click the [Register] button.
If you need to make changes, click the [Back] button.Account creation is complete.
Click the [Log In] button.
- 2 Obtain License Code
If you have a license issuance key, you must issue a license code in order to use the product.
Please follow the steps below.
Enter your user ID and password on the user page to log in.
Access the user page hereClick the [Add License] button.
Enter the license issuance key and click the [OK] button.
The products included in the license issuance key will be displayed.
Click the [Add to Owned Licenses] button.A list of owned licenses will be displayed, and the license code for the product included in the license issuance key will appear.
- 3 Download
Enter your user ID and password on the user page to log in.
Access the user page hereA list of owned licenses will be displayed.
From the right side of the screen, click [Download] for the “New Version Installer” of the purchased product.
The installer file download will begin.
- 4 Install
※ If an older version is installed, it must be uninstalled first.
Right-click the downloaded file and select [Run as administrator].
After selecting the language, choose [Install Floating License Server] from the installation menu.
For more details, please refer to the installation guide.
- 5 License Activation
Launch NetLicenseController.
3DTascalX Floating
From the Windows Start menu, go to[All >]/[N]/[NetLicense]/[NetLicenseController]
If the [User Account Control] dialog appears, click [Yes].
Click [OK] to start the service.
If the message “Failed to connect to the License Server” appears and you click [OK], NetLicenseController will launch.
If the [Start] button for the service is grayed out, the service has already started.
Click [License Management] to launch the Activation Manager.
Click [Internet Activation / Renewal] on the left side of the screen.
Copy the license code of the purchased product from the user page, paste it into the Activation Manager, and click the [Get Product Information] button.
※ If a proxy is configured (the error message “212: Failed to connect to the server.” is displayed), enter the required information from [Settings] on the left side of the screen.
※ If the “9999: Other Error” message appears, or if activation still fails after setting up the proxy, please proceed with Proxy Activation.
The name of the purchased product and its options will be displayed.
Click the [Start Activation] button.
Clicking the [Yes] button will start the activation process.
When all items reach 100%, click the [Close] button.
When the license code activation is successful, the product name, option name, and expiration date will be displayed on the Activation Manager main screen.
※ If the firewall in Windows Defender or other security software is enabled,
allow communication for “LicServ.exe” located in C:\Program Files\NetLicense”.After closing the Activation Manager, exit NetLicenseController, then download the “New Version Installer” on the PC where 3DTascalX will be used (client), and from the installation menu, select [Install 3DTascalX].
FLOW License Renewal Process
Update(For existing customers)
Update
- 1 License Activation
※ Operate 3DTascalX Floating on the PC where the License Server (Network License Server) is installed.
Launch the Activation Manager.
3DTascalX Node-locked
From the Windows Start menu, select[All >]/[#]/[3DX**]/[C’set ActivationManager]
3DTascalX Floating
From the Windows Start menu, go to[All >]/[N]/[NetLicense]/[C’set ActivationManager]
3DTascalX/Light
From the Windows Start menu, go to[All >]/[#]/[3DXL**]/[C’set ActivationManager]
3DFovi
From the Windows Start menu, go to[All >]/[#]/[3DFovi]/[C’set ActivationManager]
(**indicates a number.)
If the [User Account Control] dialog appears, click [Yes].
Click [Internet Activation / Renewal] on the left side of the screen.
Select the product to update and click the [Update Activation] button.
※ If a proxy is configured (the error message “212: Failed to connect to the server.” is displayed), enter the required information from [Settings] on the left side of the screen.
※ If the “9999: Other Error” message appears, or activation still fails even after configuring the proxy, please perform proxy deactivation followed by proxy activation.
Clicking the [Yes] button will start the activation process.
When all items reach 100%, click the [Close] button.
When the license code activation is successful, the product name, option name, and expiration date on the Activation Manager main screen will be updated.
FLOW Proxy Activation and PC Change Process
Proxy Activation / Proxy Deactivation (If an error occurs during license activation or deactivation)
Proxy Activation
- 3DTascalX Node-locked
- 3DTascalX Floating
- 3DTascalX/Light
- 3DFovi
- 1 Operations on an Offline PC
※ This is required when performing license activation on a PC without Internet access (offline PC) using a PC with Internet access (online PC).
It is also used if the error “9999: Other Error” occurs during license activation on an online PC. In that case, all operations are performed on a single online PC.If the product is not installed, please install it from 02. Download.
Launch the Activation Manager.
3DTascalX Node-locked
From the Windows Start menu, select[All >]/[#]/[3DX**]/[C’set ActivationManager]
3DTascalX Floating
From the Windows Start menu, go to[All >]/[N]/[NetLicense]/[C’set ActivationManager]
3DTascalX/Light
From the Windows Start menu, go to[All >]/[#]/[3DXL**]/[C’set ActivationManager]
3DFovi
From the Windows Start menu, go to[All >]/[#]/[3DFovi]/[C’set ActivationManager]
(**indicates a number.)
If the [User Account Control] dialog appears, click [Yes].

Click [Proxy Activation] on the left side of the screen.

Select the product to activate and click the [Export Activation File] button.

The [Save As] dialog will appear.
Set the location to save the file, and save it as [cset_activation_file.nrs].
Save this file to a desired location on the online PC.

- 2 Operations on an Online PC
Enter your user ID and password on the user page to log in.
Access the user page here
A list of owned licenses will be displayed.
Click [Perform Proxy Activation] on the right side of the screen.
The Proxy Activation File selection screen will appear.
The corresponding license code will be displayed. After confirming, click the [Select] button.

The [Open] dialog will appear.
Select the file [cset_activation_file.nrs] that you saved in your desired location, and click the [Open] button.

The cset_activation_file.nrs file will be loaded.
Click the [OK] button.
The Proxy Activation Target Selection / Download screen will appear.
The product name for proxy activation will be displayed.After confirming, click the [Download Activation File] button.

A list of owned licenses will be displayed,
and the [authenticated_cset_activation_file.nrs] file will be downloaded.Save this file to a desired location on the offline PC.

- 3 Operations on an Offline PC
Launch the Activation Manager.
If the [User Account Control] dialog appears, click [Yes].

Click [Proxy Activation] on the left side of the screen.

Click [Go to Load Activated File].

Click [Load Activated File].

The [Open] dialog will appear.
Select the file [authenticated_cset_activation_file.nrs] that you saved in your desired location, and click the [Open] button.
The product name for which proxy activation was performed is displayed, and the activation process is complete.
You can now use the product.
Proxy Deactivation
- 3DTascalX Node-locked
- 3DTascalX Floating
- 3DTascalX/Light
- 3DFovi
- 1 Operations on an Offline PC
※ This is required when performing license deactivation on a PC without Internet access (offline PC) using a PC with Internet access (online PC).
It is also used if the error “9999: Other Error” occurs during license deactivation on an online PC. In that case, all operations are performed on a single online PC.If the product is not installed, please install it from 02. Download.
Launch the Activation Manager.
3DTascalX Node-locked
From the Windows Start menu, select[All >]/[#]/[3DX**]/[C’set ActivationManager]
3DTascalX Floating
From the Windows Start menu, go to[All >]/[N]/[NetLicense]/[C’set ActivationManager]
3DTascalX/Light
From the Windows Start menu, go to[All >]/[#]/[3DXL**]/[C’set ActivationManager]
3DFovi
From the Windows Start menu, go to[All >]/[#]/[3DFovi]/[C’set ActivationManager]
(**indicates a number.)
If the [User Account Control] dialog appears, click [Yes].

Click [Proxy Deactivation] on the left side of the screen.

Select the product to deactivate and click the [Export Deactivation File] button.

The [Save As] dialog will appear.
Set the location to save the file, and save it as [cset_deauthorize_file.drs].
Save this file to a desired location on the online PC.
- 2 Operations on an Online PC
Enter your user ID and password on the user page to log in.
Access the user page here
A list of owned licenses will be displayed.
Click the [Proxy Deactivation] button.

The Proxy Deactivation File selection screen will appear.
Click the [Select] button.

The [Open] dialog will appear.
Select the file [cset_deauthorize_file.drs] that you saved in your desired location, and click the [Open] button.

The cset_deauthorize_file.drs file will be loaded.
Click the [Proxy Deactivation] button.
A list of owned licenses will be displayed.
The activation status of the product for which proxy deactivation was performed will change to “Not Activated.”

Changing the PC After License Activation
- 3DTascalX Node-locked
- 3DTascalX Floating
- 3DTascalX/Light
- 3DFovi

Deactivate License
- 3DTascalX Node-locked
- 3DTascalX Floating
- 3DTascalX/Light
- 3DFovi
- 1 Deactivate the License on the Current PC
※This is required when activating the license on another PC (e.g., replacement).
Launch the Activation Manager.
3DTascalX Node-locked
From the Windows Start menu, select[All >]/[#]/[3DX**]/[C’set ActivationManager]
3DTascalX Floating
From the Windows Start menu, go to[All >]/[N]/[NetLicense]/[C’set ActivationManager]
3DTascalX/Light
From the Windows Start menu, go to[All >]/[#]/[3DXL**]/[C’set ActivationManager]
3DFovi
From the Windows Start menu, go to[All >]/[#]/[3DFovi]/[C’set ActivationManager]
(**indicates a number.)
If the [User Account Control] dialog appears, click [Yes].

Click [Internet Deactivation] on the left side of the screen.

Select the product to deactivate and click the [Deactivate] button.

The product name and option name will be displayed.
Click the [Start Deactivation] button.

Clicking the [Yes] button will start the activation process.
When all items reach 100%, click the [Close] button.

The deactivation process will start.
When all items reach 100%, click the [Close] button.
※ If the “9999: Other Error” message appears or deactivation fails, please perform Proxy Deactivation.

Click the [OK] button.
Then, click [Close] on the left side of the screen to exit the Activation Manager.License deactivation is now complete.

When license code deactivation is successful, the product name and option name will no longer be displayed on the Activation Manager main screen.
(**However, if the trial period remains, the product name and expiration date will be displayed as a trial version.)
When the license code deactivation is successful, the activation status in the “Owned Licenses” section on the user page will change to “Not Activated.”

- 2 Download on Another PC
Enter your user ID and password on the user page to log in.
Access the user page hereA list of owned licenses will be displayed.
From the right side of the screen, click [Download] for the “New Version Installer” of the purchased product.
The installer file download will begin.
- 3 Install
※ If an older version is installed, it must be uninstalled first.
Right-click the downloaded file and select [Run as administrator].
For installation instructions, please refer to the installation guide below.
- 4 License Activation
Launch the Activation Manager.
3DTascalX Node-locked
From the Windows Start menu, select[All >]/[#]/[3DX**]/[C’set ActivationManager]
3DTascalX Floating
From the Windows Start menu, go to[All >]/[N]/[NetLicense]/[C’set ActivationManager]
3DTascalX/Light
From the Windows Start menu, go to[All >]/[#]/[3DXL**]/[C’set ActivationManager]
3DFovi
From the Windows Start menu, go to[All >]/[#]/[3DFovi]/[C’set ActivationManager]
(**indicates a number.)
If the [User Account Control] dialog appears, click [Yes].
Click [Internet Activation / Renewal] on the left side of the screen.
Copy the license code of the purchased product from the user page, paste it into the Activation Manager, and click the [Get Product Information] button.
※ If a proxy is configured (the error message “212: Failed to connect to the server.” is displayed), enter the required information from [Settings] on the left side of the screen.
※ If the “9999: Other Error” message appears, or if activation still fails after setting up the proxy, please proceed with Proxy Activation.
The name of the purchased product and its options will be displayed.
Click the [Start Activation] button.
Clicking the [Yes] button will start the activation process.
When all items reach 100%, click the [Close] button.
When the license code activation is successful, the product name, option name, and expiration date will be displayed on the Activation Manager main screen.
When the license code activation is successful, the activation status in the “Owned Licenses” section on the user page will change to “Activated.”